Review: Turning Pro (Steven Pressfield)

A few weeks ago I read Turning Pro by Steven Pressfield, who also happens to be my new BFF who I had the pleasure of having breakfast with last week (more on that later, believe me).  One of the things I like most about this book is that Pressfield doesn’t soft-pedal his advice at all:  basically, he’s the honeybadger of writing coaches:  Ohh, are you whining about how you have writer’s block and how ‘the muse’ hasn’t visited you lately?  Much like the honeybadger, Steven Pressfield doesn’t give a f%^k.  He wants you to get off that couch and get your writing done.  He wants you to take yourself seriously as a writer/ artist, and I agree.  In fact, I will take it one step further and say that I think you should take yourself seriously as a writer, write a book (or five), then get serious about yourself as a business-person and start getting yourself out there in a big way.   To me, “Turning Pro” is a swift kick in the ass for people who are making excuses and waiting for someone (like an agent or a publisher) to give them permission to keep writing.

This really resonates with me because, come hell or high water, I write and I get my stuff out there.  I work hard, I am generous with advice, and I will always help someone in need (case in point, almost every day I get requests from writers/ creative types to tell them what to do to fix their websites, or to sell more books, or to get more people to their websites (this is always contextual, but I try to always answer the questions to the best of my ability).

Pressfield has a great passage in this book about WWI soldiers shooting themselves in the foot when it came time to go to battle, because the pain of shooting yourself is (mentally, at least) less painful than having to go and fight whatever might be over that next hill.    Here’s an excerpt:

“The habits and addictions of the amateur are conscious or unconscious self-inflicted wounds.  Their payoff is incapacity.  When we take our M1903 Springfield and blow a hole in our foot, we no longer have to face the real fight of our lives, which is to become who we are and to realize our destiny and calling.”

I totally agree, and I will say as a witness, this kind of shooting yourself in the foot doesn’t end even when you have finally turned pro, become a writer, and finished your book.   It is AMAZING to me, and I mean AMAZING at how little of my advice people actually follow (and I am including advice that they seek me out and pay for), and how little authors/ creative types are willing to actively engage in their own success, whether this means putting themselves on a regular writing schedule, or fixing broken links on their website, or even taking a single first step toward putting their digital profile in order (or, as I would call it “Turning Pro 2.0,” in which I tell you:  You’ve written a book (or five)?  Good for you.  Now you need to pull your website together, get on social media, and let people know about your work.)  That is how book marketing works in the brave new world of the internet:  no one will know about you unless you tell them, but if you spend too much time telling them, then you are not doing the work.

So, in short, I totally think you should read this book, and then get back to work on your book, then read my book, set up a website and start marketing that book.   Pull it together!   No one’s going to take you seriously until you do that yourself.

Seriously.  Pull it together.   Read it, live it, and then read my book,  out there and turn pro with your marketing, because (as my BFF Steven Pressfield and I can both attest), that writing career isn’t going to make itself.

Oh, and while you’re at it, I totally think you should watch this hilarious interview that Steve did with Chris Brogan.

Advertising Your Book on Amazon KDP– a Step by Step Guide

If you’re looking to boost the visibility of your book and win new readers, Amazon’s advertising platform is a powerful place to do it. Yes to paid advertising all day long! Sponsored Product Ads, in particular, can help you stand out in a crowded market and reach potential buyers who are actively browsing or searching for books. Below is a straightforward, step-by-step guide to get you started.

However (and this is a big however!), I bet you’re not ready to run ads, and I would love to save you some money by making sure you (and your book) are totally ready before you spend one penny on ads.


Step 1: Prepare Your Author Platform

Before you invest in ads, make sure there’s a way for new readers to stay connected with you—beyond just a single purchase. That’s where your author platform comes into play.

  • Create or Update Your Website
    Even a simple site that showcases your books, your bio, and an email signup form helps establish credibility. Include links to your social media pages, plus an easy way for readers to contact you.
  • Offer a Reader Magnet
    Provide a free short story, a bonus chapter, or any other special content in exchange for readers’ email addresses. This way, when ads drive traffic to your Amazon book page, you can also direct people to your site to join your email list.
  • Stay Active on Key Social Channels
    It’s better to focus on one or two platforms (e.g., Facebook, Instagram) rather than trying to be everywhere. Regular updates and interactions show potential readers you’re an engaged, authentic author and will give them a chance to follow and engage with you that you don’t have to keep paying for (and also, hopefully, get them to sign up for your email list).

An established platform doesn’t just build trust with potential readers—it also means you won’t be depending on ads alone to maintain contact with your audience. Once someone discovers you through an ad, you have a place to invite them where they can become long-term fans.

I’m so serious right now– do NOT PROCEED TO THE NEXT STEP UNTIL THIS IS DONE. Do not spend one penny on advertising, marketing, or book promotion of any kind until you have these things set up. If you do, you are basically pumping money through your book, not building your career and your business as an actual author.If you don’t have a link inside your book to a reader magnet where people can sign up for your email list, you are not ready to run paid ads.  Stop right here and set all of that up!!


Step 2: Prepare Your Book Listing

A good ad can only do so much if your product page isn’t ready to convert visitors into buyers. Treat your listing like a mini sales page.

  • Book Cover
    Make sure it looks professional and matches the style typical of your genre. Think of your cover as a billboard that has just a few seconds to capture attention.
  • Competitive Analysis
    Look at other top-selling books in your genre. Pay special attention to their cover design, book descriptions, pricing, and keywords. Ask yourself what makes your book different or more appealing. Incorporate these insights into your own listing strategy.
  • Description
    Write a concise, compelling blurb that hooks readers right away. If it’s too long or unorganized, visitors may lose interest. Use Amazon-allowed HTML (bold, italics, bullet points) to make it more scannable.
  • Keywords & Categories
    Fill in relevant, accurate keywords so Amazon knows when and where to display your book. Double-check you’re in the best categories to reach your ideal readers.
  • Reviews
    While not strictly required to start advertising, having some positive reviews can dramatically increase your conversion rate once people click on your ad.

Step 3: Access Amazon Advertising

  1. Log in to KDP: Go to your KDP Bookshelf at kdp.amazon.com and sign in.
  2. Select a Book: Find the title you want to promote and click “Promote and Advertise.”
  3. Open Amazon Advertising: You’ll land in the Amazon Advertising dashboard, where you can create and manage campaigns. If it’s your first time, Amazon may provide a quick tutorial.

Step 4: Choose Your Campaign Type

Sponsored Products are the most common and beginner-friendly option for authors:

  • Reach Readers in Search: Your ad can appear in search results for relevant keywords.
  • Feature Your Book Cover: Readers see your cover, title, and a short text snippet, which is very direct and clickable.

Click “Create campaign” and select “Sponsored Products.”


Step 5: Decide on Targeting

Amazon offers two main targeting methods for Sponsored Products:

  • Automatic Targeting
    Amazon uses your book’s metadata—title, subtitle, categories, and keywords—to decide who sees your ad. This option is quick to set up and great for gathering data on which search terms convert.
  • Manual Targeting
    You choose specific keywords or ASINs (competing or complementary books). This approach provides more control but requires keyword research.

Many authors begin with an auto campaign to discover which keywords work best, then launch a manual campaign focusing on the strongest keywords or ASINs.


Step 6: Set Your Budget and Bids

  • Daily Budget
    Decide how much you’re willing to spend each day (e.g., $5 to $10 is typical for beginners). You can increase this later if you see good traction.
  • Default Bid
    This is the amount you’re willing to pay per click. Start modestly—maybe $0.30–$0.50—then adjust if you’re not getting enough impressions or if your costs are too high.
  • Bid Optimization
    For beginners, “Dynamic bids—down only” lets Amazon lower your bid in real-time if it thinks a click is less likely to convert. This helps keep you from overpaying.

Step 7: Create Your Ad Copy (Optional)

Sponsored Products ads typically display your book cover and metadata by default. However, you may have the option to add a short custom text blurb. Keep it brief, focusing on a key benefit or hook for your target readers. Avoid promotional language like “On sale now” or “#1 best seller,” as Amazon’s policies may disallow certain claims.


Step 8: Review and Launch

Double-check everything:

  • Campaign name (helps you stay organized if you run multiple campaigns)
  • Start/end dates (you can leave it open-ended and pause manually)
  • Budget and bids (are they realistic for your goals?)
  • Targeting type (auto or manual)
  • Ad creative (cover, short text)

When satisfied, click “Launch campaign.” It can take a few hours—sometimes up to 24—for Amazon to approve and start displaying your ads.


Step 9: Monitor and Optimize

Advertising on Amazon isn’t a “set it and forget it” process. Keep an eye on:

  • Impressions: If these are too low, consider raising your bid or increasing the daily budget.
  • Clicks/CTR: A low click-through rate might mean your cover or ad text isn’t resonating with your audience.
  • Sales/ACOS: Look at your Advertising Cost of Sales. Aim to keep it below your profit margin.
  • Search Term Report: Especially useful for auto campaigns. Identify which terms or ASINs lead to profitable sales, and which just eat up your budget.

Step 10: Expand with Manual Campaigns

After you’ve gleaned insights from your auto campaign, create Manual Sponsored Products campaigns:

  • Keywords: Add the high-performing terms from your auto campaign.
  • Negative Keywords: Exclude words that consistently lead to clicks but no sales.
  • ASIN Targeting: If a particular competing or complementary book converts well, target that ASIN specifically.

Adjust bids as needed. Raise bids on profitable keywords, lower or pause those that are underperforming.


Step 11: Rinse and Repeat

Amazon advertising is an iterative process:

  • Test New Keywords: Trends change, new reader preferences emerge, so keep refining your approach.
  • Experiment with Additional Campaign Types: Sponsored Brand ads (if you have multiple books) or Lockscreen ads (on Kindle devices) can also be worth exploring.
  • Stay Vigilant: Even small tweaks—like altering your bid by a few cents—can have a meaningful impact on your results.

Final Thoughts

Advertising on Amazon can be a fantastic way to reach new readers, but it works best when you’ve prepared a rock-solid foundation. By building a vibrant author platform, refining your book listing (with a solid cover, compelling description, and smart keyword choices), and understanding how to target your ads, you’ll give yourself the strongest chance for success. Then, once your campaigns are live, stay curious and keep optimizing—because the best results come from thoughtful experimentation and consistent follow-through.


All About BookFunnel: What is It? Why Do Authors Need It? Is it Worth it?

Because I am (apparently) never done bombarding you with new things you need and have to pay for, let’s talk about something I use that I think you should use if you have the budget:  BookFunnel.

What is BookFunnel?

Long story short, BookFunnel is a website that helps authors deliver their books to readers seamlessly. It offers a range of tools for distributing eBooks, managing giveaways, conducting pre-orders, and building an engaged reader base. By providing a one-stop shop for all of this stuff, BookFunnel simplifies the (often overly complicated) processes of book distribution and reader engagement.

Why Would You Need It?

One of the primary reasons authors use BookFunnel is its ability to facilitate seamless book distribution. That means you can deliver their books directly to readers in multiple formats, including ePub, PDF, and MOBI, ensuring compatibility across various devices and eReaders. This flexibility enhances the reader’s experience by reducing technical barriers to accessing your work. It makes your life easier because you don’t have to manage multiple emails of people having technical problems trying to open your pdf on whatever e-reader they are using at the moment (which you know all too well if you’ve ever tried to manage a free giveaway like bonus material or ARC distribution in eBook form). What you don’t want is to be trying to trouble-shoot every single person’s tech problems while you’re in the middle of your launch, and BookFunnel solves that problem for you. To me, that alone makes it worth the money.

Building and managing email lists is another advantage BookFunnel offers. As I’ve said approximately one million times, an engaged email list is one of the most valuable assets for an author, and BookFunnel integrates seamlessly with popular email marketing services like Mailerlite and Email Octopus. These integration enable authors to grow their subscriber base by offering free books or exclusive content as incentives for sign-ups, fostering a direct line of communication with their readers.

ARC distributions and bonus materials are the reason I personally use them. I used to distribute all of that kind of stuff via PDF, but then I heard a crazy nightmare story about a fellow author sending out ARCs via PDF (using one of the services, not their own list, just to be clear), and later having one of the ARC readers upload that PDF into Amazon and publish it as their own work.  Because the PDF didn’t have any kind of tracking or watermarking, the author could not prove ownership to Amazon and ended up having to get a lawyer involved to get their work back.

After that I stopped distributing any of my work via PDF.  Now I only use ePubs distributed through BookFunnel, with watermarking and tracking turned on. BookFunnel employs secure delivery methods to prevent unauthorized sharing and piracy. Features like DRM-free downloads and personalized download links ensure that authors’ work is protected while still being easily accessible to legitimate readers.

And look, I get that if you’re a first-time author, alot of that probably seemed like gibberish to you and something that you don’t even want to think about yet, and I get that. The problem is, that kind of thing is something that can happen to you at any time in your career (and in fact, the scary example above was for that author’s debut novel), so it actually benefits you to put some advanced security measures in place, even if it costs extra.  I do feel like the money you will spend on BookFunnel is money that you would probably have spent on an ARC service if you didn’t know what you were doing, if that’s any reassurance. This is another example of “build it the first time properly and you won’t have to spend money to revise it,” I suppose.

BookFunnel Pricing

BookFunnel offers several pricing tiers to cater to authors at different stages of their careers and with varying needs. The Basic Plan starts around $15 per month and includes a limited number of downloads, basic email integrations, and standard support. This plan is ideal for authors who are just starting out and have modest distribution needs, and you can pay for a year in advance to get a discount.

The Pro Plan is approximately $29 per month and offers increased download limits, advanced email integrations, priority support, and additional customization options for delivery pages. This plan suits growing authors who need more robust features to manage their expanding reader base and promotional activities.

For established authors with larger audiences, the Premium Plan costs roughly $99 per month. It includes unlimited downloads, full access to all integrations and customization options, dedicated support, and enhanced analytics and reporting. This comprehensive plan is perfect for authors who require extensive distribution capabilities and detailed insights into their promotional efforts.

It’s important to note that pricing may vary, and BookFunnel occasionally offers discounts or custom plans for high-volume authors and publishers, making it adaptable to different budgetary requirements.

Setting Up BookFunnel

Getting started with BookFunnel is a straightforward process that begins with choosing a pricing plan on their website. Many authors start with a free trial to explore the features before committing to a paid plan. Once you’ve selected a plan, the next step is to integrate BookFunnel with your preferred email marketing service. This integration streamlines list-building by automatically adding new subscribers to your email list when they download your book through BookFunnel.

After setting up the integration, upload your properly formatted eBook files (ePub, PDF, or MOBI) to your BookFunnel account. Ensuring your book is free of errors will provide readers with the best possible experience. With your files in place, create a download page and personalize it with your branding elements—like your author photo, book cover, and a compelling call-to-action. BookFunnel’s templates make this easy, even if you have limited design skills.

Once your download page is ready, it’s time to set up your first campaign. Whether you’re planning a giveaway, a pre-order, or a promotional offer, be sure to define clear parameters for participation—such as asking readers to join your email list or share your campaign on social media. After you’ve finalized these details, distribute the download link through your website, social media channels, email newsletters, and other marketing platforms. BookFunnel’s real-time tracking tools help you monitor performance and make adjustments on the fly.

Finally, once your campaign concludes, review the analytics to see what worked and what could be improved. Use these insights to refine your future campaigns, optimizing your strategies for better results and stronger reader engagement.

Conclusion

In the competitive world of publishing, standing out requires more than just writing a great book—it involves effectively promoting and distributing it. BookFunnel offers authors a powerful set of tools to streamline these processes, from managing giveaways and pre-orders to building a loyal email list and engaging with readers. Its user-friendly interface, comprehensive features, and robust integrations make it an indispensable asset for authors aiming to maximize their reach and impact.

By investing in BookFunnel, authors can save time, protect their work, and create meaningful connections with their audience, ultimately driving greater success in their writing careers. Whether you’re launching your first novel or looking to enhance your existing promotional strategies, BookFunnel provides the support and functionality needed to thrive in today’s digital landscape.


For more information, visit BookFunnel’s website to explore how it can help you reach more readers and streamline your book promotion efforts.

Your Email List: Your Most Valuable Asset as an Author

Let’s talk about something that might surprise you. You know how everyone says you need to be on social media, have a fancy website, and constantly promote your latest book? Well, I’m going to let you in on a little secret: while those things are nice, they’re not the most powerful tool in your arsenal.

What is? Your email list.

I know what you’re thinking – “Email? Really? Isn’t that kind of… old school?” Trust me, I hear this all the time. But here’s the thing: your email list is the one marketing asset you actually own and control. And that’s huge.

## Here’s Why This Matters So Much

Think about it this way: every time someone buys your book on Amazon, guess who gets to keep their contact information? Not you – Amazon does. They’re over there building relationships with your readers while you’re left wondering how to reach them again. Pretty frustrating, right?

And social media? Sure, it’s great, but those followers don’t really belong to you. Facebook or Instagram could change their algorithm tomorrow (we’ve all seen it happen), or those platforms could take away your accounts, and suddenly your posts are reaching basically nobody. Not fun. Also, how about that TikTok ban looming on the horizon? How would you like to be one of those authors who is ONLY selling books because of TikTok?  That’s going to be a rude awakening if the ban goes through. However, if those authors had been getting even a fraction of those book buyers to sign up for their email lists, they’d be better off and not have to start all over.

Speaking of starting over, let me describe a very common phenomenon I see with almost every author I start working with.

## The Endless Launch Cycle Trap

This is when authors have to start from scratch with every single book launch. They’re out there hustling on social media, running ads, doing everything they can think of to reach new readers. It’s exhausting, and honestly? It doesn’t have to be that way. If those authors would just stop and set things up properly so they were consistently building their email lists, each launch would be easier.

## Let Me Make This Super Simple

There are really just three things you need to set up (Let’s call them the 3Ls to make them easy to remember):

1. A List – Pick an email service (like MailerLite or EmailOctopus- anything but MailChimp! – there are tons of good ones. Here’s a list.)
2. A Link (or a QR code) – Something easy for readers to type or click
3. A Landing Page – A page where people can sign up (usually in exchange for something cool, like a bonus chapter). I use BookFunnel for this but you can put a page on your author website or use one from your email service. Just make sure it is super simple to remember in case your reader is going to actually type it in to the internet.

That’s it! No fancy website needed, no complicated marketing schemes. Just these three pieces working together.

## “But I Don’t Know How to Do Any of That!”

I totally get it – this stuff can feel overwhelming at first. That’s exactly why I put together a free guide that walks you through everything step by step.  You can grab that here.

(See what I did there? That’s exactly the kind of link you’ll want to include in your books!)

## Don’t Make This Mistake

Here’s something that makes me sad every single day: I can’t tell you how many authors I’ve worked with who have written dozens of books but never collected a single email address. They always say the same thing: “I wish I’d started this years ago.”

Don’t let that be you! If you’ve already published books without an email signup link inside, every sale is a missed opportunity to connect with a potential superfan. Don’t beat yourself up about it. All you can do is start where you are, right now, today.

## Ready to Take Action?

Here’s your super simple game plan:
1. Grab that free guide I mentioned
2. Sign up for an email service (almost all of them have free plans to start)
3. Create a simple landing page with something cool to give away
4. Put that link in your books

That’s it! Once you’ve got this foundation in place, everything else becomes so much easier.

Remember: your email list is like a direct line to your readers’ hearts (and maybe their wallets too – let’s be real). Don’t wait to start building it!

Migrating Your Author Site from SquareSpace to WordPress: a Step by Step Website Guide

You’re here because your built your author website on SquareSpace (maybe “just to get it over with,” I hear that alot) and now you feel stuck. You like how the site looks, but you feel trapped by the monthly fees and you don’t know what step to take next. Or maybe you were fine with your website (because you didn’t know it could be cheaper) until you read this article, and now you have buyer’s remorse and want to move it.

I get it!  I’m here for you.  I want you to have a website you like and are in total control of (meaning, it is your actual firstnamelastname.com) that is also budget-friendly.  While I do think your website is a super important part of your author platform, I don’t think you’re going to use it a ton (at least at first), and I definitely don’t want you paying something crazy like $30/ month for it. At the beginning of your writer career at least, you’re just putting your website in place as one of the puzzle pieces, mostly to take over that space in the search engines and to give people the opportunity to sign up for your email list. I feel like those requirements can be met for about $5/ month, honestly.

Where do you even start with this?

Good question. To be totally honest with you, migrations are always kind of a chaotic, frustrating mess. That’s a “you don’t know what you don’t know” situation, and the more built up the site is, the more loose ends you’ll end up having to chase down. It helps to keep reminding yourself that ultimately, the headache is going to be worth it to save all that money.

I would start with your domain. The first thing to do is transfer your domain away from SquareSpace so you can control the DNS (where the domain actually points to). SquareSpace counts on you not wanting to know that much about the inner workings of your website, so they maintain control over that part of it (and charge you a premium for that privilege, for whatever reason). If you’ve been exclusively in the SquareSpace world, you might not even be aware of the fact that you can (and should!) register your domain somewhere else for less money. My “best practice” domain registrar is NameCheap, and here’s the thing– once you transfer your domain over there, you can always point it back to SquareSpace if you decide not to do the migration.  So, let’s tackle that one first just to save you some money.

What we’re doing here is moving your website over from SquareSpace to NameCheap, with WordPress.org (a software) as the back-end.  Once your site is built out of WordPress (rather than SquareSpace’s technology), it will look completely different, so start mentally preparing for that now. I know you like the SquareSpace design, but you can’t take it with you (sorry!). This is about saving you money.

How to Transfer Your Domain from Squarespace to NameCheap

Before You Start

Make sure your domain meets these requirements:

  • At least 60 days old (ICANN rule)
  • Not expired
  • Domain lock is disabled
  • You have access to the email address listed on the domain

If your domain doesn’t meet all of these requirements yet (like, because you just registered it at SquareSpace), that is totally fine!  Bookmark this post and come back to this later.

Step 1: Prepare Your Domain in Squarespace

  1. Log in to your Squarespace account
  2. Go to Settings > Domains
  3. Click on your domain name
  4. Disable domain lock if enabled
  5. Request an authorization code (EPP code)
    • Click “Get Authorization Code”
    • Squarespace will email this code to you
    • Keep this code handy – you’ll need it for NameCheap

Step 2: Start the Transfer at NameCheap

  1. Go to NameCheap.com
  2. Go to Domains> Transfer
    3. Type in your domain name. It will give you some information about whether the domain is “eligible for transfer,” which is just referring to whether it is technically “old enough” to be moved. Do not let any of the language alarm or confuse you. You’re doing great!

4. Add the transfer to your cart

5. Complete the checkout process (transfers typically cost around $10-15)

Step 3: Enter Authorization Code

  1. After purchase, go to your NameCheap dashboard
  2. Find the domain under “Domain List” > “Transfer Domain”
  3. Enter the authorization code from Squarespace
  4. Follow the prompts to confirm domain ownership

Step 4: Approve the Transfer

  1. Check the administrative email address associated with your domain
  2. Look for an email requesting transfer approval
  3. Click the approval link or follow instructions to approve
  4. The transfer process will begin

Step 5: Wait for Completion

  • Transfer typically takes 5-7 days
  • Both Squarespace and NameCheap will send status updates
  • Don’t cancel your Squarespace domain service until the transfer is complete

Step 6: Update DNS Records (If Needed)

Once the transfer is complete:

  1. Log into your NameCheap account
  2. Go to Domain List > Manage
  3. Click “Advanced DNS”
  4. Add any necessary DNS records for:
    • Website hosting
    • Email services
    • Third-party services

Important Notes

  • Keep your Squarespace account active during the transfer
  • Save copies of your current DNS records before the transfer
  • The transfer fee typically includes one year of domain registration
  • Your website might experience brief downtime during DNS propagation

Troubleshooting Common Issues

If it seems like SquareSpace doesn’t want you to leave:

1. Stay positive and persistent. This is happening
2. Tell them “It’s fine, I’m just moving my domain over to a less expensive registrar. I still like you.”
3. Keep saying “No thank you” until they give you the damn code already.

If your transfer gets stuck:

  1. Take several deep breaths and remind yourself that this is going to be worth it.
  2. Verify your domain is unlocked
  3. Verify the authorization code is correct
  4. Ensure your contact information is accurate
  5. Contact NameCheap support if needed (they have wonderful chat support)

After the Transfer

  1. Verify your domain works correctly
  2. Update contact information if needed
  3. Set up auto-renewal if desired
  4. Save your NameCheap login information
  5. Go back and cancel your Squarespace domain service


Step 2:  Get (Cheap) Hosting, Install WordPress

Once the domain is settled (so to speak), your next move is to get some hosting and install WordPress on it. I would recommend just using NameCheap’s hosting because it is the easiest to set up, and frankly, you have enough to worry about right now and are probably just about over this process already.
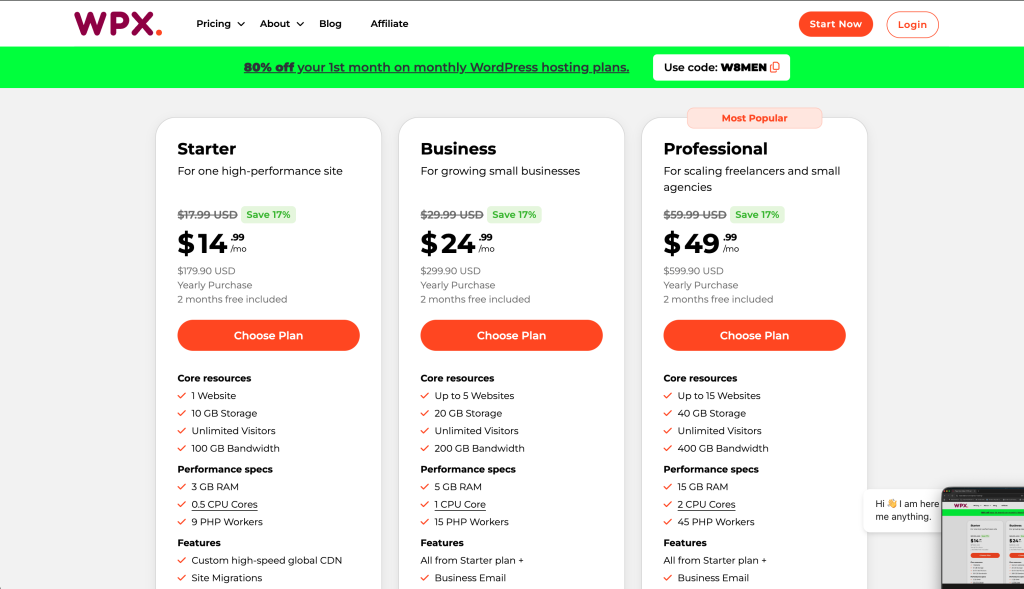
So, go back over to NameCheap, click on “Hosting,” then “Shared” and choose one of these options:

I would love for you to pick “Stellar Plus” (the one in the middle) or “Stellar Business” (the one on the right) because those give you the option of hosting more than one website and I want you to leave your options open for growth, but honestly, if the $2/ month option is looking super appealing right now because of what you’ve been paying SquareSpace, I get it!  Do that!!

When that’s done (and remember, your site still “lives” at SquareSpace so it will look like it always did), that is all you can do on the NameCheap side, so you’ll need to go back over to SquareSpace and start packing up your virtual boxes in preparation for your big move.


Don’t stress!  This is going to work out!

Step 3:  Go to SquareSpace, export your site

The process of moving your content from Squarespace to WordPress involves several key steps. First, you’ll need to export your Squarespace content. Go to Settings > Advanced > Export in your Squarespace dashboard. This will create an XML file containing your pages, posts, and some basic content structure.

However, be aware that not everything will transfer perfectly. You’ll likely need to manually move or recreate:

  • Custom page layouts
  • Contact forms
  • Image galleries
  • Product listings (if you have an online store)
  • Email newsletter integrations

Now’s the time to really go through the site and go on a copy/ paste frenzy, man. Back that entire site up, one page at a time, and save it somewhere like Google Docs. That way, even if the XML import doesn’t work, you can rebuild by hand.

Step 4:  Set Up WordPress

Now, it’s time to get WordPress up and running so you can begin the import process.

  1. Install WordPress on Your Host: Most hosting providers have a one-click install option. Follow their instructions to set up WordPress.
  2. Access Your WP Dashboard: Typically, you’ll go to yourwebsite.com/wp-admin to log in. Enter the credentials you created during the install.
  3. Pick a Theme: While you can start with a default WordPress theme, you might want to explore themes specifically for authors. Look for something that’s responsive (mobile-friendly) and suits your brand. You can always switch themes later.

Note: Don’t sweat the design details too much yet. You can fine-tune your theme and layout after the content is in place. Just make sure to take a bunch of screenshots of your SquareSpace site so you can find a WordPress theme that looks vaguely similar.

5. Import Your Squarespace Content into WordPress

Now for the fun part—bringing your blog posts and pages to their new home.

  1. In WordPress, Go to Tools → Import: You’ll see a list of options for importing.
  2. Install the WordPress Importer Plugin: If you haven’t already, WordPress will prompt you to install this. It’s free and quick to set up.
  3. Upload Your Squarespace XML File: Select the file you downloaded from Squarespace, and hit Upload and Import.
  4. Assign Authors: If you’ve got multiple authors or want to assign a specific user to the imported posts, you can handle that here.
  5. Wait for the Process to Complete: Once it’s done, you’ll see a success message. Congratulations—your basic content is now in WordPress!

Warning: Some elements—like photo galleries, forms, or custom code blocks—won’t come through. Make a note of these so you can re-create them.

6. Rebuild and Tweak Your Pages

Time to roll up your sleeves and ensure everything looks good on your new WordPress site.

  1. Compare Pages: Remember the content inventory you made in Step 1? Go through each page in WordPress and see what’s missing or needs updates.
  2. Set Up Navigation: In Appearance → Menus, create or edit your main menu so that it mirrors (or improves upon) your old Squarespace menu.
  3. Add Missing Images and Graphics: Some images may not have transferred. Re-upload them to your Media Library (via Media → Add New), then insert them into your pages/posts.
  4. Recreate Forms: If you had a contact or newsletter form, install a WordPress form plugin (like Contact Form 7, WPForms, or Gravity Forms) and rebuild those forms.
  5. Tidy Up Formatting: Check for any stray formatting quirks. Sometimes paragraphs or headings might need a bit of cleanup.

Pro Tip: If you had a newsletter signup on Squarespace, integrate a WordPress-compatible email marketing plugin or embed the signup form from your chosen email service provider so you can continue to capture subscribers.


7. Design and Branding

Your author website should reflect who you are as a writer and what visitors can expect from your books.

  1. Customize Your Theme: Head to Appearance → Customize to play with fonts, colors, and layout options.
  2. Install Essential Plugins:
    • SEO Plugins (Yoast SEO or Rank Math): Helps improve your discoverability on search engines.
    • Caching Plugins (WP Rocket or W3 Total Cache): Speeds up your site’s performance.
    • Security Plugins (Wordfence or Sucuri): Helps protect against hacks and malware.
  3. Test Your Site on Mobile: Make sure your new WordPress site is mobile-friendly. Most modern themes are responsive, but it’s always good to double-check.

Bonus Tip: Consider a page builder like Elementor, Beaver Builder, or Gutenberg blocks if you want more drag-and-drop flexibility in designing your pages. This can be particularly helpful if you’re not super techy but still want a custom look.


8. Point Your Domain to Your New WordPress Site

Once your site is looking good on WordPress, it’s time to make it live for the world to see. This is where you’ll connect (or “point”) your domain to your new hosting.

  1. Log into Your Domain Registrar: (in this case, NameCheap)
  2. Update DNS Settings: Change your nameservers (or A record) to the ones your new hosting provider gave you.
  3. Allow Time for Propagation: It can take anywhere from a few minutes to 24-48 hours for your new site to appear under your domain across the internet.

9. Run Final Checks

Once your domain is pointing to your new site, do a thorough review.

  • Check All Pages: Is the layout correct? Are images showing up?
  • Test Links: Make sure internal links work properly and external links open as expected.
  • Review SEO Settings: Ensure you have the right title tags, meta descriptions, and alt text for images.
  • Enable Backups: Set up a regular backup system using a plugin or your host’s built-in backup service.

Reminder: This is the perfect time to share your new website with a few trusted friends or beta readers. Have them poke around and let you know if they spot any issues or typos.


10. Announce Your New Site

You’re live, so it’s time to celebrate—and let your audience know.

  1. Send an Email to Your List: Announce your new site to your mailing list, highlighting any cool new features (like a brand-new freebies section or updated book page). Dude!  This is why I am always going on and on (and on) about building an email list!
  2. Post on Social Media: Show off screenshots or a behind-the-scenes look at your design journey. Invite readers to comment on the new look.
  3. Update Links: Make sure all your social media bios (Twitter/X, Instagram, Facebook, LinkedIn, etc.) point to the correct domain.

Extra Touch: Offer a small giveaway or bonus chapter as a “housewarming” treat to encourage folks to stop by the new site and poke around.


11. Maintain & Grow

Your WordPress site is up and running (and you have hopefully stopped being mad at me for how difficult this process turned out to be), but your journey doesn’t end here.

  • Keep Plugins and Themes Updated: This helps protect against security issues.
  • Regularly Publish Blog Posts or Book Updates: Keep your content fresh and your readers engaged.
  • Monitor Performance: Use Google Analytics or a similar tool to track traffic and see how visitors interact with your site.
  • SEO & Marketing: Continue optimizing your site for search engines, and ramp up your marketing efforts to bring new readers on board.

Pro Tip: Consider installing a plugin like Broken Link Checker to make sure your site remains healthy over time. It alerts you if any links stop working, so you can fix or remove them quickly.


Final Thoughts

Migrating from Squarespace to WordPress can feel like a big leap, but with a bit of planning and some careful execution, you’ll land on your feet with a shiny new author site that gives you more customization and control. Now, you can flex your creative muscles beyond what Squarespace offered—and really make your online author platform your own. Plus, think of all that money you’re saving!

Good luck, and happy building!

How to Use SlideShows on TikTok to Promote Self-Published Books

TikTok (especially BookTok!) has become a powerful platform for indie authors looking to expand their reach and increase book sales. With the right strategies, you can leverage the platform’s unique features to build an engaged audience and boost your income. Here’s a step-by-step guide to creating effective TikTok content and maximizing your results.

Why TikTok Works for Indie Authors

TikTok’s short-form video format is ideal for storytelling, sharing tips, and showcasing your books. Many authors have succeeded on the platform by creating engaging content that resonates with their target audience. While there may be an initial learning curve, TikTok’s potential to go viral can lead to significant exposure and earnings.

Step 1: Ensure Your Platform is Set Up Properly

Nope, I’m never going to stop harping on this! Before diving into TikTok content creation, make sure your platform is optimized to capture and engage potential readers.

This includes:

  • Linking to a Reader Magnet Inside Your Book: Include a link to a free bonus (e.g., a short story or chapter) that encourages readers to sign up for your email list.
  • Setting Up an Email Signup Form: Ensure your website prominently features a signup form to capture visitor information.
  • Creating a Strong Onboarding Sequence: Use automated email sequences to welcome new subscribers and guide them toward your other books or content.
  • Optimizing Your Website and Social Media: Ensure your website and social media profiles clearly encourage email signups with CTAs (calls to action) and compelling incentives.

Always focus on building your email list—it’s one of the most valuable tools for indie authors to connect directly with readers.  Remember, you do not own Tiktok or your followers on that platform!  TikTok (or any social media) can go away at any time, so make sure you’re just using them as a means to an end and not as your primary sales driver! I’m serious!

Step 2: Create Slide-Based Videos

Slideshow videos have proven to perform well on TikTok, especially for educational or storytelling content. Follow these tips to create effective slideshows:

  • Make Videos 20-25 Slides Long: Longer slideshows tend to perform better, as they hold viewers’ attention for more time.
  • Use a Consistent Background: Choose one background for all slides to ensure a cohesive and professional look. You can create slides directly on TikTok, make slides on Canva and upload them, or use a service like AuthorScale. Totally up to you and your budget!
  • Keep Slides Simple: Focus on delivering clear and concise information on each slide.

Step 3: Write Compelling Hooks

The first few seconds of your video are crucial for capturing attention. Use tools like AuthorScale to generate engaging hooks that draw viewers in immediately. A strong hook can make the difference between a viewer scrolling past or staying to watch your content.

Step 4: Post Consistently

Consistency is key on TikTok. Posting multiple times a day increases the likelihood of reaching different audience segments. A recommended schedule includes:

  • 2 Posts During the Day
  • 2 Posts at Night

This approach ensures your content reaches viewers across various time zones and activity levels.

Step 5: Use TikTok’s Built-In Features

TikTok’s algorithm favors videos that use trending audio and features. When uploading your slideshows, consider:

  • Posting directly through apps like AuthorScale to streamline the process.
  • Allowing TikTok to select the music for your videos to boost engagement.

Step 6: Drive Traffic to External Platforms

If you’re unable to sell directly on TikTok, use the platform to drive traffic to external sites like Amazon or your author website. Include clear calls-to-action in your bio and videos to guide viewers to your books.

Key Takeaways

  • Slideshow videos are an effective format for creating engaging TikTok content. Their visual appeal and simplicity make them easy for audiences to consume.
  • Posting consistently increases your visibility and engagement.
  • Strong hooks and trending audio can significantly boost your video’s performance.
  • TikTok is a powerful traffic driver for authors who strategically link their content to external platforms.

By following these strategies, indie authors can harness TikTok’s potential to grow their audience and achieve their publishing goals.

What is BookTok and How Can It Help You Sell Books?

BookTok has emerged as one of the most powerful forces in contemporary book marketing, transforming how readers discover new titles and revolutionizing the publishing industry’s approach to promotion. This deep dive explores what BookTok is, why it matters, and how authors and publishers can harness its potential.

Understanding BookTok

BookTok is the book-loving community on TikTok, where readers, authors, and industry professionals share content about books through short-form videos. What makes BookTok unique is its organic, authentic nature – it’s driven by genuine reader enthusiasm rather than traditional marketing strategies.

Why BookTok Matters

The impact of BookTok on book sales has been nothing short of remarkable. When a book goes viral on BookTok, it can lead to massive sales spikes, even for titles that have been out for years. The platform has demonstrated an unprecedented ability to create bestsellers, particularly in the young adult and romance genres.

What Makes Content Go Viral on BookTok

The most successful BookTok content typically falls into several categories:

  • Emotional Reactions: Videos showing genuine emotional responses to books, whether tears, laughter, or shocked gasps, tend to perform well. These raw reactions create curiosity and connection with viewers.
  • Creative Book Recommendations: Videos that recommend books based on specific moods, themes, or other popular media can quickly gain traction. For example, “If you liked this movie, you’ll love this book” or “Books that will make you sob uncontrollably.”
  • Aesthetic Content: Beautiful book photography, creative transitions, and appealing visual presentations of books often attract attention and engagement.

How to Leverage BookTok as an Author

1. Make Sure You’re Ready

Before diving into BookTok, ensure you have your author platform fundamentals in place:

  • A professional author website that’s mobile-friendly and easy to navigate
  • A compelling reader magnet (free book, novella, or exclusive content) to attract subscribers
  • An email signup system with automated delivery of your reader magnet
  • Links inside your published books directing readers to your website, reader magnet, and social media – don’t miss this crucial touchpoint with existing readers. Use BookFunnel for this!

These elements create a solid foundation that allows you to capitalize on any BookTok success by converting viewers into long-term readers and subscribers.

2. Understand the Platform

Before diving in, spend time watching BookTok content to understand the platform’s unique culture, trends, and content styles. Pay attention to what resonates with viewers and what falls flat.

3. Create Authentic Content

BookTok users value authenticity above all else. Focus on creating genuine content that reflects your personality and passion for books rather than obvious marketing attempts. Here’s a whole article about creating slides for your TikToks.

4. Engage with the Community

Active participation in the BookTok community is crucial. This means:

  • Responding to comments on your videos
  • Engaging with other creators’ content
  • Participating in trending hashtags and challenges
  • Creating content that adds value to ongoing conversations

5. Utilize BookTok-Specific Strategies

  • Create series of related content to keep viewers coming back
  • Use trending sounds and music appropriately
  • Incorporate popular BookTok hashtags
  • Time your posts for maximum visibility

Tips for Publishers

Publishers can capitalize on BookTok’s influence by:

1. Supporting Author Initiatives

  • Provide resources and training for authors interested in creating BookTok content
  • Help coordinate virtual events and challenges
  • Create shareable content that authors can use

2. Building Direct Presence

  • Maintain an active publisher account sharing behind-the-scenes content
  • Highlight upcoming releases in creative ways
  • Share reader reactions and testimonials

3. Influencer Collaboration

  • Partner with established BookTok creators for book launches
  • Send advance review copies to influential BookTok users
  • Create exclusive content or editions for the BookTok community

Common Pitfalls to Avoid

  1. Don’t focus solely on selling. BookTok users can spot overly promotional content from miles away.
  2. Avoid forcing trends that don’t fit your brand or book. Authenticity matters more than jumping on every trend.
  3. Don’t neglect engagement. Success on BookTok requires consistent interaction with the community.
  4. Don’t expect overnight success. Building a following takes time and consistent effort.

Measuring Success

Track your BookTok efforts through:

  • Video views and engagement rates
  • Follower growth
  • Hashtag usage
  • Direct sales correlation
  • Website traffic from TikTok
  • Mention tracking

The Future of BookTok

As the platform continues to evolve, we’re seeing new trends emerge:

  • Increasing focus on diverse voices and representations
  • Growing influence in adult fiction markets
  • Integration with other social media platforms
  • Development of BookTok-specific marketing strategies

Conclusion

BookTok represents a significant shift in how books are marketed and sold in the digital age. Its power lies in its ability to create genuine connections between readers and books, fostering a community that celebrates reading in all its forms. For authors and publishers willing to invest time in understanding and engaging with the platform, BookTok offers unprecedented opportunities to reach new readers and build lasting connections with their audience.

Remember that success on BookTok isn’t just about following a formula – it’s about finding authentic ways to share your love of books with a community that’s eager to discover their next favorite read.

How much does it cost to publish a book on Amazon?

Editor’s note: we now have an entire website dedicated to the self-publishing process!  Go on over to SelfPublishingChecklist.com, where we walk you step by step through the entire self-publishing process.

YES, the whole process can be done for free– we’ve tested it!

For many writers considering self-publishing, cost is the first question and concern. The range authors spend to self-publish varies dramatically. You can choose to self-publish completely free, doing everything yourself, or you can spend thousands upon thousands of dollars paying for printing, marketing, and other services. The trick is finding the happy medium of buying what you need and doing what you can on your own. Read on to see three distinct budgets for authors who want to put their books out themselves, which is a great option!

A writer can easily spend a few thousand dollars getting books printed, only to have them become a permanent fixture in their garage because she has no idea how to get them into bookstores. Or, a writer can create an ebook completely on their own, and his mom and his friends will buy it, but then sales will stop completely because he is not a book marketer.

So where does the money go? Let’s assume you have a novel you’d like to publish. What will you spend? Let’s break down some possible scenarios, starting with the most-requested “free option.” Totally do this yourself!  Do every single part the best you can, bootstrap your way up to a sustainable income, then re-invest that money into the next book. It has been done! It can be done!

Budget publishing – Free

  • Developmental/ copy edit  – Writers’ groups, classes, beta readers
  • Cover Design – Barter or do it yourself on Canva
  • Book formatting and layout – Do the print version in Word, set up the ebook using Kindle Create or use Reedsy‘s free editor
  • Printing – free (KDP is free to upload and pays you royalties)
  • ISBN – Use Amazon’s free ISBN for the print version(s) of the book, your Kindle ebook doesn’t need one
  • Author photo – free (Your Facebook profile picture is fine)
  • Marketing – free (Set up free email list account using this guide, rely on social media to get the word out about your book), do the five free KDP Select days to try to push your book’s BSR down and grow your list for your next launch.
  • Website– skip it for now or use a free blog like WordPress.com

Considering that half of self-published authors earn less that $500, any amount more than this may seem disheartening. However, consider that a book a is a product. Quality products are supported by a whole team of services and experts. According to a survey reported by The Guardian, the average earnings for self-published authors is $10,000 a year. What separates those earning $500 from those earning $10,000? Visibility and quality of product. If you invest nothing in your book, don’t expect readers to be very impressed, or compelled to buy. While it’s easier than ever to get a book to market, readers are savvy and spot sub-par products easily. Even if you create a beautiful product, wonderfully written with professional presentation, if no one hears about it, your book will sit untouched online, gathering virtual dust.

Here is a breakdown I find reasonable for many authors:

Smart spender – About  $2,000 – 4,000

  • Developmental edit $1,000
  • Copy editing $800
  • Cover Design $500
  • Book formatting and layout $300 (One-time cost for Vellum, all subsequent books will be free)
  • Printing – free (Print on demand only)
  • ISBN – $200 (buy a block from Bowker)
  • Author photo – $100
  • Total marketing spend – $1000 (Review service, Promo buys, Amazon ads)
  • Website – $100 (For custom WordPress theme)

This scenario may be tweaked. For example, you can find brilliant marketing help for just a couple hundred dollars. Maybe you spend a reasonable $2,000 on a developmental edit, but then find a student to do your final proofing for just $500.

This is still a formidable amount of money for many authors. Few have $5,000 extra laying around. Luckily, there is much you can do to make this investment achievable. For example, you don’t need to be paying for editing at the same time you’re buying marketing. These expenses may be spread out over many months. Plus, many editors and marketers will work out payment plans with you as well.

Big spender – Upwards of  $20,000

  • Developmental edit $3,000
  • Copy editing $1,500
  • Cover Design $800
  • Book formatting and layout $1500
  • Printing– still free using KDP, $149 to put the book in with Ingram
  • ISBN – $100
  • Author photo – $400
  • Kirkus Review – $425
  • Google Adwords – $500
  • Facebook Ads – $500
  • Print advertising – $1,200
  • Marketing collateral – $1,000
  • Marketing consultant / PR  – $2,000
  • Events / launch party – $1,000
  • Website – $2,000

Just as there are few writers with extra cash lying around, there are few writers that are only writers. Most of us have a few other marketable skills as well. Perhaps you are a fantastic editor, or an illustrator. Maybe you’re a social media whiz, or can build webpages. Consider taking on freelance work, or even trading services with other authors, in order to get the help you need for your project.

Bottom line, publishing is a business, and businesses cost money. If you want readers to buy your book, you will need to make an investment in order to produce a quality product, above and beyond your amazing writing. The good news is that with so many paths to self-publishing, there is a way to get the help you need without going broke.

Save

What Goes in an Email Onboarding Sequence?

OK!  Now that you have your email list set up and are actually getting people joining your list, let me help you turn your email list subscribers into true fans with some practical tips. When someone first joins your list to get that free book (or whatever fantabulous reader magnet you are offering), don’t just send them the download link and disappear. Think of it like making a new friend – start by introducing yourself! Share a bit about why you write and what makes you tick.

Why Would You Do This?

A good onboarding sequence:

  • Introduces Your Brand: Helps readers understand who you are, what you write, and what they can expect from your emails.
  • Builds Trust: Reinforces that signing up for your list was a great decision by offering immediate value.
  • Encourages Engagement: Guides readers to take specific actions, like downloading a free eBook, following you on social media, or leaving a review.
  • Drives Sales: Provides opportunities to promote your books or services in a way that feels natural and not overly pushy.

What works really well is a series of welcome emails that gradually build that connection. After they get their free book, maybe tell them about what inspired your stories or share some of your favorite reads. Once they’re getting comfortable, invite them to join your social media circles or reader groups. And don’t forget to ask for their thoughts on the free book – reviews help everyone!

Here’s a five-email onboarding sequence you can use as a template.  Feel free to rewrite the subject lines to reflect your personality and / or to be more specific to your niche.

Email 1: Welcome & Free Gift

  • Subject Line: “Welcome! Here’s Your Free Gift”
  • Content:
    • Thank the reader for signing up.
    • Provide the download link for your free eBook or resource.
    • Briefly introduce yourself (e.g., “I’m [Your Name], and I write [Genre].”).
    • End with a friendly invitation to reply (e.g., “I’d love to hear what you think of the book!”).

Email 2: Let’s Get to Know Each Other (Sent 1-2 Days Later)

  • Subject Line: “A Little About Me”
  • Content:
    • Share your journey as an author.
    • Explain what inspired you to write your book(s).
    • Ask an engaging question (e.g., “What’s a book that has stayed with you long after reading it?”).

Email 3: Recommended Reads & Resources (Sent 2-3 Days Later)

  • Subject Line: “Books You’ll Love”
  • Content:
    • Share a curated list of your books or similar reads they might enjoy.
    • Include links to purchase or download your other titles.
    • Add a personal touch by explaining why you recommend these books.

Email 4: Add Value (Sent 2-3 Days Later)

  • Subject Line: “Tips for [Your Genre/Topic] Fans”
  • Content:
    • Provide practical tips or insights related to your genre (e.g., “How to Enjoy More Thrilling Mysteries” or “5 Ways to Find Time for Reading”).
    • Mention any communities or resources you’ve created, such as a Facebook group or exclusive content.

Email 5: Special Offer (Sent 2-3 Days Later)

  • Subject Line: “A Special Thank-You for Joining”
  • Content:
    • Offer an exclusive discount or bonus for one of your books or related products.
    • Thank them again for being part of your community.
    • Politely ask for a review

OK, let’s stop and take a deep breath, because I sense you’re feeling overwhelmed.  Let me reassure you that email marketing services like MailerLite and Email Octopus make this kind of thing very easy to set up, and that you’re only going to have to do this once and you’ll get the benefit of this sequence emailing new people FIVE TIMES once they sign up.  That’s five emails you don’t have to send!  That’s a good thing!

Here’s a little pep talk about mindset to help you psych yourself up to actually put all this in place. I see you, introvert!  I know you’d rather be doing almost anything else.

Once They Are Yours……

I don’t know how to tell you this, but some of your new subscribers just came for the free book. They are not going to make it through the onboarding sequence, and that is fine! You only want people on your list who actually want to hear from you, believe me. Once you’ve found your “tried and true” readers, start emailing them on a regular basis by creating and distributing a regular newsletter.

Your regular newsletters are where the real relationship grows. Whether you’re popping into their inbox weekly or monthly, share things that matter to them – maybe a peek at your latest chapter, a short story they won’t find anywhere else, or the real story behind your characters. Make it feel like you’re chatting with a friend, not selling to a customer.

Sure, you’ll want to mention your other books, but keep it casual. “Hey, if you enjoyed [free book], you might get a kick out of [paid book]!” Sometimes throw in a special deal just for your subscribers – they love feeling special.

Get your readers involved in your world. Let them vote on character names, share their fan art, or join your book discussions. The more they feel part of your writing journey, the more invested they become.

Remember that different readers want different things. Some might love getting early access to new books, while others might need a gentle nudge with another freebie to stay engaged. The trick is to notice these differences and adjust accordingly.

When you’ve got a new book coming out, your email list is your secret weapon. Share your writing ups and downs, offer some advance copies, maybe even plan a virtual launch party just for them.

And hey, it’s not all about books – signed copies, cool bookmarks, or exclusive content memberships can add extra value. The key is staying genuine and consistent. Your readers signed up because they like your writing, but they’ll stick around because they connect with you as a person.

Keep this relationship genuine, add real value, and your subscribers will naturally become your biggest supporters and book buyers. Hang in there!  This stuff gets easier the more you do it, I promise!

Resources/ references:  as always, I will encourage you to read these two amazing books by Tammi Labreque:

Tammi possesses the unique ability to make these concepts seem accessible and even doable!  These are on my “must have” list for authors!

What Happened to Kindle MatchBook? Can You Still Give Away eBooks for Free?

Amazon discontinued the Kindle MatchBook program on October 31, 2019. In case you care, this program launched in 2013 and allowed customers who purchased a print book to obtain the Kindle eBook version at a reduced price or even for free. However, due to limited participation from major publishers and low customer awareness, Amazon decided to retire the program.

My theory on the “low customer awareness” portion of this is that Amazon realized there was absolutely no benefit (to them) to make it easy for their customers to get free books, so they conveniently did not promote it. That’s fine, more opportunity for you!

As of now, there is no direct replacement for Kindle MatchBook. Customers interested in both print and digital versions of a book typically need to purchase each format separately. Some publishers may offer bundled deals independently, but these are not standardized across the platform.

I think what you should do with this is: offer the eBook edition of your print book for free by putting a link in your print book’s interior that leads to a free download. By offering your eBook as a free bonus (or, reader magnet!) to readers who purchase your print book, you can create exceptional value for your audience while building a stronger connection with your readers.

Here’s how you can easily implement this strategy:

Set Up a Landing Page for the Giveaway

Your first step is to create a streamlined way for readers to access your free eBook. Start by establishing a dedicated landing page using BookFunnel or your author website. Choose an easy-to-type URL like “[YourWebsite].com/ebook” – remember, readers will be typing this from your printed book. Include an email sign-up form to deliver the eBook (and grow your email list).

Put a Link in Your Print Book’s Interior

Next you’ll need to crack open your print book’s interior and put in the link. Add an engaging message in both the front matter to capture early interest and the back matter to catch readers after they’ve finished your book. Try something like:

“Love this story? Get the eBook version free at [YourWebsite].com/ebook”

In case I just blew your mind with publishing industry jargon, the “front matter” is the stuff in the front of your book (before the book actually starts) and the “back matter” is the stuff at the end after the book is finished. I include this link in both places, and I add in a request for a review at the end as well. I am more shameless about the back matter because I figure if a reader makes it all the way to the end, they must like something about me/ my writing.

Create a Seamless Download Experience

Make downloading your eBook effortless and enjoyable. Provide multiple format options (EPUB, MOBI, and PDF) to accommodate different devices (this is what BookFunnel does). Ensure your landing page looks professional and works flawlessly on mobile devices, as many readers will access it from their phones. Maintain consistent branding between your book and landing page to create a cohesive experience.

Then What?

Oh, I’m so glad you asked me that. Once a person signs up for your email list, please send them an onboarding sequence to get them used to hearing from you (and offer them other things you have for sale). I promise, this is not as cheesy and sales-y as it sounds. An onboarding sequence is a fantastic way for authors to make a strong first impression and build trust with new subscribers. When someone joins your list, they’re most engaged and eager to learn more about you, and a structured sequence helps you capitalize on that momentum. It allows you to introduce yourself, share your story, and set expectations for what subscribers will receive from you in the future. By delivering the promised freebie right away, you establish trust and show that you value their time and interest. Through consistent, value-driven emails, you can foster a deeper connection, encouraging readers to take immediate actions like downloading your book, leaving a review, or following you on social media.

More information about onboarding sequences here, or in Tammi Labreque’s wonderful “Newsletter Ninja” book.

This Seems Hard. Why Would You Do It?

Look I get it. Alot of the things I talk about are tech-heavy and I know authors don’t want to do them. Does it help if I tell you that this kind of thing is only difficult the first time you do it, and that every single thing you learn in the world of indie publishing is going to help build your career (and put dollars in your pocket)?

Does it help if I tell you that probably 90% of the authors who read this article will NOT do this, which means you will have an advantage over them?

No?  OK well, it was worth a shot.  I’m just throwing it out there!!